"Because life is good, home cooking is best, and there is always something to be grateful for." - Christy Jordan

Monday, January 31, 2011

Easy and cozy Taco Soup!

The weather is about to get nasty here in Dallas and cold weather always makes me want really warm and comforting foods, like soup!

This soup has to be one of the easiest out there, but the best part is that you can really put whatever you want in it. There are a TON of different versions that I've seen, but this is the one I like! I made it the other night for a meeting Mom had at our house the other night. So easy and so yummy!

Doesn't it look so good?!


Taco Soup (My Version)
 
1 can of yellow corn, drained
1 can of white corn, drained (or use 2 yellow)
1 can of Ranch Style black beans
1 can of Rotel tomatoes, mild
1 can of Mexican Stewed Tomatoes
1 package of dry Hidden Valley Ranch Salad Dressing Mix
1 store bought rotisserie chicken, shredded
1 tbsp. garlic powder
1 1/2 tbsp. seasoning mix (I like Johnny's seasoning, but something like Lawry's works)
1 tbsp. Mexican seasoning

Drain both cans of corn and dump into a large pot on the stove or a crock pot. Then dump the rest of the cans into the pot or crock pot and stir to combine. I usually add 1-2 cans of water or chicken stock so it is soupier (is that a word?). Add the shredded chicken and seasonings, then stir to combine everything.

If you're cooking the soup on the stove then just bring the soup up to a simmer on medium-high heat for 30 minutes; this allows all the flavors to come together and for the soup to get hot. If you're cooking the soup in the crock pot, then cook on low for 6-8 hours or high for 4 hours.

After the soup has been cooking for a while, taste the soup and make sure it's seasoned to your liking. If you like it spicy you could add more mexican seasoning, tabasco, creole seasoning or anything that would make it hot! I usually end up adding more of the garlic powder and the mexican seasoning.

Tip: This soup has SO many variations! I think the original recipe I had used browned ground beef, but the idea of ground beef floating around in soup makes me turn my nose up a little bit, so I just use shredded chicken. You could obviously use pinto beans instead of black beans, or a hotter can of rotel tomatoes. Do what you like! 

I always serve it with sour cream and shredded cheese.

Wednesday, January 26, 2011

Premature Valentine's Day Cookies

I love Valentine's Day.  Seriously.  I don't know why I love it so much. It must because there are red and pink hearts everywhere... or maybe it's because it's a great excuse to eat an obscene amount of chocolate. I think that might be it. Mostly, it's a holiday that lets you celebrate your loved ones.

I've been thinking about what kind of Valentine's Day baked goods I'd be making this year, but of course I couldn't decide on just one!  I finally decided on red velvet cake balls, chocolate cupcakes and these cute little sugar cookies. I didn't want to have a sugar overload at my house, so I'm making all these things in stages. That's why I call these "Premature Valentine's Cookies" because I know it's still January, but it never hurts to start celebrating early :)

I got the idea for these from one of my favorite food blogs, Bake at 350 .  You should see the cookies on this blog. Oh. My. Gosh. They are INCREDIBLE! Bridget, who is also a Texas girl, is so talented! I swear all her cookies are absolutely perfect.

I've been wanting to try Royal Icing for a while now, but I've just been intimidated. I think I studied Bridget's tutorial on it at least 10 times until I finally had it all planned in my head. I think it came out well, for my first try at least! I'll warn you though... it was very labor intensive and I'm going to use royal icing on special occasions ONLY. I just don't think I have the patience to do this all the time!


I used Bridget's recipe for sugar cookies and royal icing. These cookies are AWESOME. They're firm enough to decorate and taste really good!

Tips: I doubled the recipe and softened my butter for one batch and used cold for the second and really it doesn't make that big of a difference. If you use the cold butter it will just take a little longer to cream it with the sugar. I also used unsalted butter and added 1/2 tsp. of salt to the dough. Here's the recipe!

Vanilla-Almond Sugar Cookies

3 c. all-purpose flour
2 tsp. baking powder
1 c. sugar
2 sticks of salted butter, cold  (or see note above this!)
1 egg
3/4 tsp. vanilla extract
1/2 tsp. almond extract (if you don't like the almond flavor, just use all vanilla)

Preheat oven to 350 degrees.

Combine the flour and baking powder; set aside. Cream the sugar and butter together in an electric mixer. Add the egg and extracts; mix well to combine. Gradually add the flour mixture and beat until just combined, scraping down the bowl, especially the bottom.

The dough will be crumbly, so knead it together with your hands as you scoop it out of the bowl for rolling. (Just combine it into a flat-ish mound and get your rolling pin out!)

Roll onto a well-floured surface and cut into desired shapes. Place on parchment paper lined baking sheets (Bridget recommends freezing the trays with cookies for 5 minutes before putting them in the oven... I didn't do this and they came out fine.) and bake 10-12 minutes. (VERY IMPORTANT: The cookies should not be brown. They should just look baked. Parchment paper will prevent them from browning on the bottom, but make sure you don't let them get brown on top!)  Remove from oven and let the cookies sit on the tray for a few minutes on the sheet and then transfer them to a cooling rack.

Royal Icing

4 tbsp. meringue powder (I got mine at Hobby Lobby on the baking aisle)
scant 1/2 c. water (a little less than full)
1 lb. powdered sugar, sifted (sifting is VERY important, don't skip doing this!)
1/2-1 tsp. light corn syrup (This will keep the icing shiny!)
few drops of clear extract (I used clear vanilla)

Combine the meringue powder and water. With the paddle attachment of an electric mixer, beat until combined and foamy.

Sift in the powdered sugar and beat on low to combine. Add in the corn syrup and extract, if desired.

Increase the speed of the mixer to medium-high and beat for about 5 minutes, just until icing is glossy and stiff peaks form. (You should be able to remove the beater from the mixer and hold up and jiggle without the peak falling.) Do not overbeat! The icing will be thick!

Divide into enough containers for the amount of colors you want (I did 3) and colored them with gel food colors (These are SO much better than liquid food coloring because they don't change the texture and the colors are brighter). Cover with plastic wrap touching the icing when not using.

Bridget gives a WAY better tutorial on this. Here's a link to it! Royal Icing

Hope y'all enjoy!! Stay tuned for more Valentine's treats :)

Tuesday, January 25, 2011

Well, I started a blog!

After spending endless hours looking at food blogs, it finally dawned on me that I could have a food blog, too! So here it is... Welcome to "Wannabe Southern Cook!"

The "About Me" section on this thing has close to no space so I will elaborate here. I was born and raised in Dallas (and still live here!) and I am a PROUD native Texan. I graduated with a degree in public relations from Texas Tech University last May (Wreck'em Tech!) and I am enjoying life as a graduate! I absolutely love to bake and I've learned to love to cook. I feel like my brain is always thinking about some certain recipe that I can't wait to try. This will serve as my outlet to share every recipe I obsess over!

You're probably wondering about the name of my blog. Let me break it down for ya... you see, living in Dallas kinda makes me city girl and even though I don't know if I could live without Northpark Mall and all of the amazing restaurants we have around here, I would like to one day live the "small town" life, where everyone takes it slow and values the right things. I really dream about one day sitting on my front porch in my rocking chair, sippin' on my sweet tea, and counting my blessings. So even though I'm a city girl, I crave a life where everything is based around good food, family and friends.

I think that today too many people forget how blessed they are and take what they have for granted. I think southern people really appreciate the finer things in life and value friends and family. It's not about if you have the new Coach purse or if you've eaten at the new restaurant where a steak costs $40. I like how much family is valued and the food is centered around that. When I think of southern food, I think of sweet old ladies in their aprons, fryin' chicken on the stove and big family meals on Sundays after church. To southern people, a good home cooked meal shows someone you love them and I hope that when I cook for people they feel the love :)
On this blog I plan to post LOTS of good, classic southern recipes, along with recipes from other genres of cooking, and of course.... TONS of yummy dessert recipes! You will soon learn that I have a severe sweet tooth... it's a real condition, I swear it :)

Anyways, on to the food!!

The other night I made Chicken & Sausage Gumbo. It's a Southern Living recipe, so I KNEW it was gonna be good... and it definitely was!
Here's what you're going to need...

- 1 lb. andouille sausage, cut into 1/4 in. slices
- 4 skinned, bone-in chicken breasts (don't do boneless because the bones keep the chicken    nice and moist)
- vegetable oil
- 3/4 c. all-purpose flour
- 1 medium onion, chopped
- 1/2 green bell pepper, chopped (I omitted this, because I can't stand peppers of any kind, but feel free to add it to yours!)
- 2 celery ribs, sliced
- 2 qts. hot water
- 3 garlic cloves, minced (I love garlic, so I added a few extra)
- 2 bay leaves
- 1 tbsp. worcestershire sauce
- 2 tsp. creole seasoning
- 1/2 tsp. dried thyme
- 1/2 to 1 tsp. hot sauce, depending on your taste
- 4 green onions, sliced
- hot cooked rice

Start off by cooking the sliced sausage in a dutch oven over medium heat, stirring constantly. This will take about 5 minutes, just look for the sausage to brown a bit. You don't need to add any oil for this because the sausage get greasy enough! Once the sausage has browned, drain it on paper towels, reserving the drippings, and then set aside.

Here is the sausage browning...

Next, cook the chicken in the sausage drippings over medium heat, this will take about 5 minutes, but again, just look for the breasts to look a little browned. (Chicken does NOT need to be cooked through...you're just browning it right now!) Then remove the chicken to paper towels, reserving the drippings, and set the chicken aside.
Now here's the chicken doing it's thing...

Now, add enough oil to the drippings to measure 1/2 cup. I just added a scant half cup (if you don't know what "scant" means, it just means a little less than full to the top!).  Add the flour, and cook over medium heat, stirring constantly (I mean constantly), 20-25 minutes, or until roux is chocolate colored. (Okay, this part is tricky. I honestly thought I screwed up this dang gumbo right here because it started lookin' and smellin' bad, BUT it came out perfectly!) Just keep stirring and moving the mixture around and you'll be okay :)

There goes the oil and flour... keep stirring! Wait for it to turn dark.

Stir in your chopped onion, bell pepper (yuck), and celery to your roux and cook, stirring often, 8 minutes or until tender.  
It doesn't look very tasty right now, but it will be. I promise!

Gradually add the 2 qts. of hot water and bring it to a boil. Now add your chicken back in the pot, then add your garlic and the next 5 ingredients. Reduce the heat to low and simmer, stirring occasionally, for 1 hour. Remove the chicken and let cool. (This is where the chicken finishes cooking.)
See, I told you it would start to look more like gumbo!

Add your sausage and green onions into the pot and cook another 30 minutes. Once the chicken is cool, remove the bones (the meat should come off pretty easily) and tear the meat into bite size pieces. At this point you should give it a little taste and make sure it's seasoned the way you want it to. I think I added a little more creole seasoning, worcestershire and hot sauce. Add the meat to the gumbo and simmer for 5 minutes. Remove and discard the bay leaves.
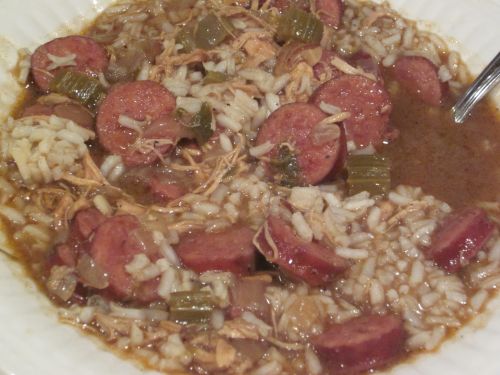
Looks good, doesn't it?!

Remove the gumbo from the heat and serve over hot, cooked rice. Garnish with green onions. I served my gumbo with some Jiffy corn muffins on the side.

 
YUM!

I got the thumbs up from both my parents, so I think this recipe is a keeper :) Hope y'all enjoy!