"Because life is good, home cooking is best, and there is always something to be grateful for." - Christy Jordan

Monday, December 24, 2012

Christmas Baking Extravaganza & The Importance of Saying "Thank You"

Merry Christmas, y'all! I really can't believe Christmas is here. I feel like Thanksgiving was just yesterday and that I've missed out on enjoying the Christmas season. I feel like now that I'm a working girl that these things fly passed me. I remember looking forward to Christmas so much in college. You cram, cram, cram for finals, pack up your car, and head home for a nice long holiday break. Back then during Christmas break I had time to sit at home and enjoy everything about Christmas. Baking, shopping, family time, friends, Christmas lights and decorations, Christmas movies....ahhhh, the good ole days. Now I barely have time to get all my shopping done! Oh well, we all have to grow up sometime.

Here are a few of my favorite ornaments on our tree! :) It's definitely a Texas Tech Christmas in our house!


Let's talk about presents. I LOVE giving people presents that I know they'll like. I try and put a lot of effort into paying attention to details, learning what my friends and family like and don't like, and then surprising them with the perfect gift. It makes me feel good to know that they enjoy the present that I picked out for them and I love seeing them smile when they open it. However, even though it feels great to give gifts to the people you care about, it can feel really terrible if you don't feel like that person appreciated it. Am I right? 

Now, I know what you're thinking "It's better to give than it is to receive".... but I'm not talking about receiving presents here- I'm talking about saying "thank you"... and meaning it. I've recently learned this lesson the hard way. I spent some time and money on getting people gifts and I feel like it was shrugged off like it wasn't a big deal. I won't lie... it didn't make me feel good. The best thing to do in these situations is to learn from it. I'm not saying that I won't continue to buy gifts for my loved ones, but I'm going to make damn sure that if someone buys a gift for me or does something nice for me that they know how much I appreciate it.

Being gracious and being an appreciative person will speak volumes about your character. Having good manners is one of the most important things to me. Good manners will never go out of style and it will only help you get further in life. I try and be actively aware of saying "please", "thank you", and being extremely polite. 

If someone does something nice for me, I try and do everything I can to let them know how much I appreciate it. Recently when I unexpectedly broke my ankle... I couldn't believe how many of my friends and family rallied around me and helped me get through it. I broke my ankle, had surgery, had a hard cast for 10 days, was in a boot for several weeks, and spent many grueling days on crutches. Although there were times where I really thought I couldn't do it because of how much pain I was in or how the crutches were rubbing my underarms and hands raw (It ain't pretty, folks!), my supportive friends and family stepped up and encouraged me to keep going and reminded me that it would get better. I tried really hard to make sure I was genuinely thanking people for being so supportive and making me feel so much better about the situation. It doesn't have to be an extreme gesture- a nice thank you note, a big "thank you" hug, etc. Anything to make them feel good! The power of a genuine "thank you" can't even be described. It's more than just the words, it's the way you make the other person feel. Take it from Maya Angelou-

"I've learned that people will forget what you said, people will forget what you did, but people will never forget how you made them feel."

So, if you take anything away from this, please be conscious of  your manners this Christmas. Life is too short to not tell your loved ones how much you love and appreciate them. It's more than just saying thank you for the gifts... say thank you like you mean it!

Enough of my rant! Let's get down to the baking!

Every Christmas I plan a day where I just hang out in the kitchen all day and whip up some baked treats for friends and family. I like to make a bunch of different things and pack them all in little boxes so that they can enjoy them for Christmas. I'm a big fan of the homemade gift, especially food gifts!

This year I made a few new things and a few things I hadn't made before. Most of the treats were super easy to make and take almost no effort. A lot of them have very few ingredients so I can list out the recipe. Some of the others I'll just provide links! I have pictures of most of the treats, but I forgot to take pictures of two of them! So here are the links to the other two:

Saltine Toffee
Graham Cracker Pralines

Peppermint Bark

1 package of white almond bark
2 tsp. pure peppermint extract (more or less to taste)
3/4 c. crushed peppermints (I used candy canes)

Melt the almond bark slowly either over a double boiler or in the microwave on intervals (30 seconds, stir, 30 seconds, stir, etc.). Stir in extract and pour over parchment paper covered baking sheet. Spread to desired thickness and sprinkle with crushed peppermints. Leave out on counter to set, or if you're impatient (like me) put it in the freezer for a little bit. Then break apart and store in an airtight container.


Chocolate Almond Clusters

1 package of chocolate almond bark
1 c. semi-sweet chocolate chips
3 c. whole, raw almonds

Melt almond bark and chocolate chips slowly either over a double boiler or in the microwave. Once melted, stir in the almonds until completely incorporated and all almonds are covered in chocolate.  Spoon mixture into cupcake liners and let set until they're set up. I put the cupcake liners in cupcake pans to help them hold their shape.


White Chocolate, Peanut & Toffee Clusters

1 package of white almond bark
1 1/2 c. dry-roasted peanuts
1 1/2 c. toffee bits (I used Heath... they're in the section by the chocolate chips)

Melt white almond bark. Stir in peanuts and toffee bits. Spoon into mini cupcake liners and let set up.


Fudge Crinkle Cookies

Christmas Crunch Bark

Cinnamon Roasted Almonds

Christmas Sugar Cookies

With these cookies, I cheated a little bit and just used two packages of Betty Crocker sugar cookie mix and followed the directions for cutout cookies. I usually do several shapes, but this year I decided to only do Christmas trees and then some pretty white ones and take the time to make good, classic icing.

If you would rather make your own sugar cookies, I've made this one several times and they are fantastic! They have a bit of almond extract in them and they always bake perfectly.


For the icing I used an icing that hardens. A while back I tried making royal icing and it was a royal disaster. I found this recipe and haven't looked back since! It's easy to whip up and pipes and floods perfectly.

Cookie Icing
1 c. powdered sugar
1 tbsp. milk
1 tbsp. light corn syrup
1 tsp. extract (I did half vanilla and half almond)
food coloring (I use the gel food coloring. It's stronger and doesn't change the consistency of the icing)

I made the icing and colored it green. Then I added probably an extra 1 1/2 c. of powdered sugar to make it thick enough to pipe. I outlined all of the trees with the thick icing and then squeezed it back into the bowl. I thinned out the icing with some milk and then used a spoon to spoon it onto the cookies. I used a toothpick to push the icing around to make sure it was all covered. Then sprinkled with sprinkles! Next I made the white and did the same process!

With this frosting, it's going to take some getting used to and trial and error to get the hang of it. Just be patient!


I put a couple of each treat in Ziplocs and packed them all way in these cute boxes I got at a craft show this year! I'm telling you... food gifts are the best!

Merry Christmas, y'all! Enjoy your time with your loved ones and remember to say "thank you" for all of your blessings. 

Sunday, August 5, 2012

Coconut Cream Pie


It's SO hot outside, y'all. I know, I know... that's all anyone complains about these days, but it is SERIOUSLY horrible. It's the kind of heat that suffocates you when you step outside and you start sweating just walking from your front door to your car even though you just spent an hour getting ready. Awesome.

My point is that in this unbearable Texas heat, I haven't really been feelin' warm desserts. Don't get me wrong... I still want dessert (let's not get ahead of ourselves), but I just want something cool. Something like.... a chilled Coconut Cream Pie. Sounds good, right?

So a few weeks ago at the grocery store, I stumbled upon this gift from the Southern Living Gods...


Mmmmhmmm. That's right. A magazine filled with Southern Living's best ever baked treats. No need to pinch yourself folks- it's not a dream!

I immediately swooned and started flipping through it while standing in line. It had chapters on everything from layer cakes to pound cakes, sheet cakes, cupcakes, pies & cobblers, ice cream pies, tarts and frostings. A baker's dream. Then, I checked out the front cover to see how much it was. TWELVE. DOLLARS. For a magazine! Seriously?! Okay, granted, there are zero ads (which is wonderful), but that's pretty steep for a magazine. I was just putting it back on the shelf when Mom said "You're not going to get that?" and I said NO because it's so pricey! She said she would buy it for me since I had been a "good girl". Thanks, Mom! And thanks for still buying me "a treat" from the grocery store, even though I'm 24 :)
I took "my treat" home and devoured it. I looked at every page with every pretty picture and read through every recipe. Y'all... this is one of those magazines that you keep for a lifetime because it's so good.

Once I got to the "Pies" section, I got pretty excited. I LOVE pie. Who doesn't? Pie is perfect. To me, it's the perfect, All-American, homemade dessert. Fruit pie, pecan pie, buttermilk pie... I'll take it any way I can get it. When I flipped to the page for "Coconut Cream Pie", I knew I had found my next endeavor. They made it look so pretty!


This pie was actually really easy to make. Anyone could do it! I promise! If you love coconut, then you'll fall in love with this pie. The chewy coconut combined with the chilled vanilla custard and fresh whipped cream makes for the perfect summer dessert that can cool you down and save you from the Texas heat. Let's get to it!

Let's go over the ingredients first:

Coconut Cream Pie
Recipe adapted from
Southern Living

1 (15 oz) package refrigerated pie crusts (2 come in a box, you'll only need 1)

1/2 c. sugar

1/4 c. cornstarch

2 c. half-and-half

4 egg yolks

3 tbsp. butter

1 c. sweetened flaked coconut

2 1/2 tsp. vanilla extract, divided

1 1/2 c. heavy whipping cream

1/3 c. powdered sugar

Garnish: toasted coconut


Start by preheating your oven to 425 degrees. You don't bake the actual pie, but we do need to cook the crust beforehand.


I think one of my favorite things about this pie is that you use pre-made, refrigerated pie crusts. I'm all for homemade things, but this just makes things a little easier. Unroll one of the pie crusts from the box and fit it over a pie plate. Make sure it's center and lift up the edges to make sure the crust is completely formed to the pie plate. You don't want any bubbles or space between the pie dish and the crust.


Remember how I said to center it? Learn from my mistakes, folks.


Since I had so much excess, I got out my kitchen shears and trimmed around the edges to even it all out. Then I folded over the rest of the excess, once it was evened out, and then crimped it with a fork.

Trim the edges 

Crimp with a fork!

Okay, now throw the pie crust in the oven and bake it for around 12 minutes. We want it to be slightly brown.

Not the prettiest thing in the world, but the "coconut cream" aspect of the pie will cover that up!

Once the pie crust is out of the oven, set it aside to cool down while you make the custard. Combine the sugar and the cornstarch in a medium saucepan. Mix them up so they're good and combined.


Then measure out 2 cups of half-and-half and add in the 4 egg yolks. The cornstarch and the egg yolks are what's going to hold this custard together in this recipe. You can save the whites and fix them for breakfast tomorrow morning! Or, if you're really fancy, you could whip them up to make a meringue on top of this pie or another pie.

Once the half-and-half and egg yolks are combined, slowly pour that into the sugar and cornstarch while whisking. Once that's combined, turn the heat on to medium to medium-high and watch it carefully.


The mixture will still be fairly thin at this point, but it will get thick. Just you wait!

Keep whisking and watching this mixture carefully. You don't want it to burn in the bottom and you want to make sure the mixture stays smooth. You'll want the mixture to boil for 1 minute and then you can remove it from the heat once it's thick. 

Thickened up!

Now it's time to stir in the remaining ingredients. Add in your 3 tbsp. of butter (I added 4 because that's what I had and I was too lazy to cut it!), 1 c. of shredded coconut, and 2 tsp. vanilla. I actually added two types of vanilla to add a little extra flavor. I used a clear Mexican vanilla (Thanks, Alese!) and some pure vanilla extract. I found some coconut flavoring in the pantry from some Malibu Rum Cupcakes I made for Rachel last summer for her birthday, so I added a heaping teaspoon of that too, just to up the ante on the coconut flavor.

Add the butter and vanilla...

Stir in the coconut...

Ready!

The mixture should be very thick and super coconutty (not a word, I know.) at this point. Now, the recipe says to cover it with plastic wrap and let it sit for 30 minutes. Let me level with ya...

I'm impatient. Go ahead and do your dishes while the custard cools down a tad, but don't feel like you need to wait 30 minutes and waste some plastic wrap on it! It will be fine!

Pour the mixture into the baked pie crust and smooth everything out. 


This is where the pie needs to chill for a while. You can put it in the fridge overnight or if you're impatient you can put it in the freezer for about 30 minutes. This will give the pie enough time to chill and set up.

Right before you take the pie out of the fridge or freezer, whip up some fresh whipped cream to top the pie with. Also, toast some coconut to make it look pretty!


To make fresh whipped cream: Pour 1 1/2 c. of heavy whipping cream in a bowl and use a hand mixer for several minutes to whip it up. Halfway through, add in 1/3 c. powdered sugar and 1/2 tsp. vanilla extract. Beat until there are stiff peaks and it's very thick. I like to use powdered sugar in whipped cream because it dissolves easier.


To make toasted coconut: Put 1 c. of shredded coconut in a skillet and turn on the heat to medium. The key is to keep stirring the coconut until it's slightly brown. You don't want it to burn at all! This might take a couple minutes, but it will make a big difference in your pie. Keep in mind: Not every little piece of coconut will brown. That's okay!

Now get out your pie and top it with your fresh whipped cream. Spread it all around and get it just like you want it. Then top the pie with your toasted coconut (make sure it has cooled a little bit) and you're done!!


The pie is ready. Aren't you excited? You should be! It's awesome and you'll be so glad you made it.

You can either slip it in the fridge for whenever you're going to serve it, or go ahead and cut yourself a slice. Just know that it should be stored in the fridge, or else you'll have a big melted whipped cream mess!


Now you should know that my dad said this is one of the best pies I have ever made. Guess I'll have a hard time living up to this standard from here on out! 

I think I'm going to use this same vanilla custard recipe to make a banana cream pie later this week since I still have a pie crust left. If you want to do that: follow this recipe exactly, except omit the coconut. Before you pour the custard into the crust, slice some fresh banana in the bottom so that it's layered between the crust and the custard. Yum!

Enjoy everyone!

Monday, May 28, 2012

Southern Blackberry Cobbler

Mmmhmmmm.... blackberry cobbler. Nothing like it! I LOVE cobbler. Any kind of cobbler, really. You've got your peach, blackberry, peach and blackberry, strawberry, cherry, chocolate.... Yes, you heard me! Chocolate cobbler! That's for another day and another post though.

There's something about that sweet fruit with the crisp cake on top that totally does me in. Some people make cobbler with just pie crust on top. No, no, no. That's just not how it's done. I want that fruit covered by a spongey, sweet cake on top. Then topped with a cool scoop of vanilla ice cream. Bluebell, of course. Is there any other kind?


Tonight I made blackberry cobbler since we had a big Memorial Day feast. We got a new grill and smoker over the winter, so we've been putting it to good use. Tonight we had smoked ribs,
baked beans, bacon ranch potato salad, fresh fruit salad with all the yummy fruit that's in season now, raspberry beer cocktail and this blackberry cobbler.

YUM! You'd think I'd be lying on the couch sitting in my overstuffed misery, but I mustered up the strength to get on here and share this recipe with y'all. You're welcome! :)


I wanted to keep this post kind of short, even though I know I've been slacking on the blog posts. I promise to get better! However, I do want to share a few things I've made lately, in case it offers some kitchen inspiration!


Slow-Cooker Chicken Parmesan

Shredded Chicken Enchiladas
"Best Burger Ever"
Pioneer Woman's Basic Pizza Crust
5 Cup Creamy Fruit Salad
Cake Batter Rice Krispy Treats
Knock-You-Naked Brownies

Now let's get down to the cobbler! This recipe is so easy and delicious that it will make your head spin. Also, if blackberries aren't your thing, swap them out with something else! You could use fresh peaches, canned peaches, raspberries, cherries.... anything you want! This is just how I made the cobbler tonight.Southern Blackberry Cobbler
Recipe adapted from Paula Deen

1 1/2 c. fresh blackberries

2 c. sugar, divided

1 1/2 c. self rising flour (or 1 1/2 c. all purpose flour, 1 3/4 tsp. baking powder, 1/2 tsp. salt)

1 1/2 c. milk

1/2 c. butter (or 1 stick)

1/2 tsp. vanilla

1/4 tsp. cinnamon

dash of nutmeg


Start off by preheating your oven to 350 degrees.


Now, we need to cook the blackberries a little bit. Cooking them in a simple syrup will not only sweeten those babies up, but it will create a yummy blackberry syrup that makes this cobbler so wonderful.


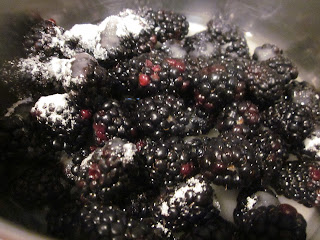
Dump the blackberries in a saucepan with 1 cup of sugar and 1/2 cup of water. Cook them over medium-high heat until the water turns the color of the blackberries and the blackberries feel softer. We still want them to be whole, just broken down a bit.


While those are cooking away, get out your dish for the cobbler (I used a 8" x 11") and plop (technical term) your stick of butter in the dish. We're going to melt the butter in the dish in the oven. Genius concept, right? So, stick the pan in the oven for just a few minutes. We want the butter just melted. If we leave it in too long, it could turn brown and yucky! I'd set a timer for about 4 minutes, then check it to see how it's doing. Even if it's not melted all the way, you could probably go ahead and take it out and just stir it around until it all melts.


Make sure you're keeping an eye on those blackberries! Give them a stir every now and then, but don't stir too much because they can break up easily.

Once the butter is melted, take the baking dish out and let it cool a little bit.


Let's whip up the cake mixture. In a bowl, combine the self-rising flour (if you have it. If not, combine 1 1/2 cups all-purpose flour, 1 3/4 tsp. baking powder, and 1/2 tsp. salt. Same thing!) Then add 1 cup of sugar and 1 1/2 cups of milk. Stir that together, then add the vanilla, cinnamon and nutmeg. The mixture will be fairly thin, so don't be nervous!


The blackberries should be good to go by now! The simple syrup should be colored like the blackberries and the blackberries might start to resemble raspberries! Take them off the heat and give them one more stir. Set them to the side for a minute.


Now, you're going to think these next few steps sound crazy, but you just need to trust me. 
Pour the cake mixture over the butter in the pan and DO NOT STIR.

I repeat: DO NOT STIR. It's not necessary. Fight the urge! Paula said don't stir, so don't do it.

"DO NOT STIR!"

Ohhh, she's just kidding :)


I love her. She's adorable. By the way, did I mention that I get to MEET PAULA DEEN IN SEPTEMBER?!?!?!?! It's true, folks. Little ole' me will be mingling with the South's finest cook and I could not be more excited! She's coming to Dallas for the Dallas Metro Cooking Show and my aunt bought me a VIP ticket to meet Paula! I get to have brunch with her, hang out with her, sit front row and her cooking demonstration.... oh my goodness! I can't wait!!!!

Okay, sorry. What were we talking about? Oh, yes, cobbler!


So yes, pour the cake mix over the butter and don't stir it! The butter will float to the top.


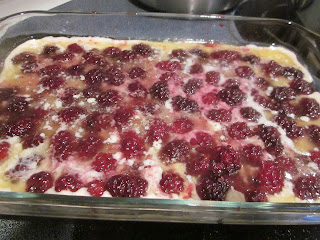
Then spoon the blackberries over the cobbler, making sure almost every bite gets a little blackberry. Then pour the blackberry syrup all over the cobbler. This is what makes this cobbler so yummy!

I know this looks like a hot mess right now, but keep the faith!

At this point I like to sprinkle a couple tablespoons of sugar over the top because it makes the cake crispy on the top. Perfect!

Now pop the dish in the oven and bake for 30-45 minutes, depending on your oven. You'll know it's done when the blackberries are bubbling and the cake is browned on top.

Ohhh yes, she's ready!

If you're like me, you like your cobbler nice and warm with a scoop of ice cream on top. This can be served room temperature too, but we all know it's better warm.

So spoon you out some! Then top it with a scoop of Bluebell Vanilla Ice Cream......... or maybe two scoops :)

Enjoy!

Monday, March 5, 2012

Bourbon Pecan Pie

Do you love pecan pie as much as I do? It's the best, isn't it? I have to be honest though... I didn't realize I had a devoted love for pecan pie until last fall. I didn't grow up having pecan pie at Thanksgiving; there were far more important pies to be made on that glorious day where you can stuff your face and not be ashamed. I always knew about pecan pie, but the weird, jelly stuff was a confusing concept to me. Why did it look the way it did? What did it taste like? Why was it jelly?

Here's the answer: BECAUSE THAT'S WHAT MAKES IT GOOD!

There's no need to ask questions. Just accept pecan pie for the delicious, sweet gift from the Food Gods that it is. 

Now that I've developed a love for pecan pie, I've become a pecan-pie-baking-machine. I can't lie, it's something you have to master- especially when you dub yourself a "southern cook". I had a phase for a while where I craved it constantly and I wanted to try it in all forms, shapes and sizes. So I made it- several times over. My family and I finally got sick of pecan pie, so pecan pie and I took ourselves a little break.

Now we're back on full force.

This is no ordinary pecan pie... this is bourbon pecan pie. That means it's laced with that sweet, "can't-find-another-flavor-like-it" whiskey flavor. Don't you think that makes it a little more southern? Me too.

I, of course, turned to one of my favorite food bloggers, Pioneer Woman, for her delicious pecan pie recipe. I've made it several times and it's never failed me. I just happen to like to spice it up a bit....with booze! You've been introduced to the Pioneer Woman right? If you haven't, do yourself a favor and get lost in her website. I know I have several times. The pictures she has with each of her recipes will make your mouth drool and make you crawl  walk to the kitchen and look for all of the ingredients to see if you can make it too at that very second. Her writing is hilarious and she makes you feel like you could be friends in real life. I know my girl Hayley knows what I'm talking about!

Let's get cookin'!


Bourbon Pecan Pie
Recipe Adapted from The Pioneer Woman

1 pie crust, unbaked (recipe below)
1 c. sugar
3 tbsp. brown sugar
1/2 tsp. salt
1 c. light corn syrup
1 tsp. vanilla extract
1/4 c. (1/2 stick) butter, melted
3 whole eggs, beaten
2-3 tbsp. bourbon or whiskey (Really, this is optional, but it tastes amazing with it!)
1 1/2 c. chopped pecans

Pie Crust:
1/2 c. (1/2 stick) of Crisco shortening
1 1/3 c. all-purpose flour
1/2 tsp. salt
1/4 c. water

Let's start off by making the pie crust. We want to get that ready to go before we make the pie filling.

This pie crust has never failed me. It's totally old school, but it's reliably flaky and perfect.

In a mixing bowl, combine the all-purpose flour and the salt. Stir it around so everything get's mixed and evenly distributed. Then cut your stick of shortening in half and place it in the bowl. (Note: If you aren't using the sticks and are just spooning it out of the tub, that's fine too. The sticks are just a lot easier to measure.)


Have I told you about my pastry cutter? This one was my Grandma's. I absolutely love it. You can tell that the wood handle used to be red, but it was either washed or used so much that it's now just wood-colored. You can still see a few streaks of red. It's probably one of my favorite kitchen tools; mostly because it was hers.

Use your pastry cutter (or you can use two knives) and cut the shortening into the flour and salt mixture. When you first get started, the shortening will flat out stick to the pastry cutter. Just slide it back off with your fingers and keep on truckin'!

You should end up with a mealy mixture like this:


When you cut the shortening into the flour and it becomes lots of tiny pieces, this is what makes pie crust flaky. Cool, huh?!

Next you're going to pour in the water and stir until it comes together. It won't come together perfectly, but you're going to knead it in a minute, so don't sweat it.

Dump the dough mixture onto a floured surface and start kneading it all together.  Pat it into a small round shape. Flour a rolling pin and start rolling! You want to make sure it's big enough to fit the pie plate. The dough will end up being between 1/8"-1/4". Don't worry if it's not perfectly round. You can fix that later! Transfer the pie crust to the pie plate and get it centered and fitted. Make sure the crust is fitted, so that every part of the inside of the pie plate is touching pie crust. Does that make sense? Basically, we're optimizing space for pie filling.


Once the crust is fitted, trim the edges so that there's not a lot of spill-over. if there's a spot where the crust is lacking, rip off a part of the crust where there's a lot of extra and press it into the naked spot. Press it in, like that's where it always belonged. No one will know!


There ya go! Okay, now what I do is fold over the slack to make a rim on the pie crust. Then I take a fork and press the fork into the pie crust to make a little bit of a design.


That's it! The pie crust is done! I know it was a long road. Luckily, the rest of the pie is easy breezy. All it consists of is measuring and dumping. Simple!

In a large mixing bowl, dump in the sugar, brown sugar, salt, corn syrup, melted butter, eggs and vanilla. Whisk it all together and get ready to get crazy. (Note: When you're measuring the corn syrup, make sure you spray your measuring cup with non-stick spray. This will help the corn syrup slide ride out with minimal stickiness!)


Ready to make this pie a little more interesting? Let's do this.


Drag out your bottle of whiskey. Jack Daniels is my whiskey of choice, but you could use any type of whiskey or bourbon. If you feel the need to make yourself a little cocktail because you had so little whiskey left that you decided that it wasn't worth saving and it was, instead, worth drinking, then so be it. You have my approval. Drinking and baking can be a good thing!

Pour in 2-3 tablespoons of whiskey and stir it into your mixture. I used 3 tablespoons and I could really taste the whiskey. Use however much you want, or leave it out all together. This pie will be delicious no matter what!

Add 1 1/2 cups of chopped pecans to the mixture. You could also use pecan halves, but I like using chopped because I feel like you get more pecan in each bite when they're chopped small. That makes sense, right? 

Pour the pie filling into the prepared pie crust. The little pecans will float to the top, so don't worry. I know it looks like a hot mess right now, but just you wait!


Whenever I'm baking a pie, I like to place the pie on a baking sheet that has been covered in foil. You never know what's going to happen in the oven and it's better to be safe than sorry. In this case, it's better to waste a piece of foil then to stand over the sink scrubbing bubbly, burnt caramel type substance off the baking sheet... or even worse- sitting in front of oven scrubbing the mentioned substance off the dirty oven floor.

Take my word for it. Bake the pie (and all future pies) on a baking sheet covered in foil. Trust me on this one.


Bake the pie at 350 degrees for 30 minutes. We're going to go ahead and cover the pie itself with foil for right now. This creates a little pocket of heat that will help the pie set up without overcooking the pecans or pie crust.

Once the pie has baked for 3o minutes, uncover the pie and bake for an additional 20 minutes. At this point, you should check the pie and see how jiggly it is. If it's still super jiggly, then cover the pie back up with foil and bake for an additional 10 minutes. Check the pie again and if it's still overly jiggly, bake for another 5 minutes. I probably baked mine for an additional 15 minutes, but my oven is old and raggedy, so it really just depends. 

The pie shouldn't be overly jiggly. A little jiggle in the middle is alright. Just make sure that the pecans look brown and toasty, the crust is lightly brown and the filling is pretty sturdy. That's what we're going for. If the pecans and crust aren't brown enough, then bake it uncovered for a little longer. If the pecans and crust are brown, but there's still some jiggle, then bake it covered for a little longer.

Betcha didn't know someone could use the word "jiggle" so many times in one paragraph!

Once your pie is perfect, take that baby out and stare at her and all her glory.


The filling will look puffed up, but it will de-puff and smooth out. Let the pie come to room temperature before you cut yourself a slice. If you cut into this pie before it's at room temperature, you're going to regret it immediately. You might cry. I've learned this lesson the hard way.

If you really can't contain yourself, throw the pie in the fridge to speed up the "setting up" process. Then you'll be able to have a slice in half the time! 

I know that after you have one bite, you'll be hooked and on the pecan pie train! If you're looking for another outrageous pecan pie recipe, I made these last fall for our Thanksgiving potluck at work. They were the bomb.

Hope y'all enjoy!