"Because life is good, home cooking is best, and there is always something to be grateful for." - Christy Jordan

Wednesday, March 30, 2011

Peachy Oat Bars!

Don't act so surprised that I made something with peaches.... I already confessed my extreme love for them. In fact, this recipe didn't even start with peaches, so, naturally, I changed it up a bit. I look at it as making it more delicious :)

Peachy. Oat. Bars. Yes, they are as delicious as they sound! And they are so, so simple. I think you'll be surprised. Now here's my question... are these considered a dessert? A snack? Breakfast even? You'll have to let me know because I'm just not sure. I think they are delicious no matter what time of day they're eaten!

I saw Giada De Laurentiis make something like this on her show a while back and I thought they looked good. Then I was browsing one of my favorite food blogs, The Pioneer Woman, and I saw them again! I took it as a sign, wouldn't you? Both Giada and Ree used apricot preserves..... uh why would I use apricot when I could use peach preserves. It's a no brainer, really.

Y'all, these are seriously good. They're buttery, crispy, crunchy and sweet, but not too sweet. Plus there's oats in them, which means that they're kind of good for you, right? That's how I see it at least. The butter and the brown sugar together make these bars outrageous.  I can't even explain it. Then the peach flavor in the middle sends it over the top.They are amazing!

I think the best part is that this recipe is one of those "good base" recipes. You could make it the original way, or alter it to your tastes by changing the flavor of fruit preserves. Do you realize how many different fruit preserve flavors are out there now? Last night when I was at the store I saw a Peach-Mango one. Who knew! It's just like how I exchanged the peach preserves for the apricot; you could use strawberry, blueberry, raspberry......the list goes on. You could even try other combos like peanut butter and jelly, chocolate chips, apple butter.... okay now my brain is running wild. I'm going to be brainstorming other combinations to try!

Peachy Oat Bars
Recipe adapted from The Pioneer Woman 

1 1/2 c. flour
1 1/2 c. oats (I used quick-cooking, but I think any will work.) 
1 c. brown sugar, packed
1 tsp. baking powder
1 tsp. salt (Use less if you're using salted butter)
1 3/4 sticks of butter, softened and cut into pieces (This is 14 tbsp. total)
1 (18 oz) jar of peach preserves (or your favorite fruit preserves)
1 c. chopped walnuts (optional)

Preheat your oven to 350 degrees. Spray either an 8"x8" square pan or a small rectangular pan with non-stick spray. I used a rectangular glass pan that was 8"x11" and it worked perfectly.

In a large bowl (I used my KitchenAid Stand Mixer) add the oats, flour, brown sugar, baking powder, salt and walnuts. Mix on low speed until everything is evenly distributed.

In go the oats...
then the flour...
 
then the brown sugar... (make sure it's packed!)

 then add the baking powder and salt.
 
Then add the walnuts and mix it all together for a minute so everything is evenly mixed. 

Now slice the butter into chunks and add it to the mixture. You want the butter to be mixed in well so there will be tons of little, tiny pieces of butter. Then when it's in the oven, all those tiny pieces melt into the brown sugar and it gets all toasty and crispy. Delicious!

Slice the butter into chunks...
 

 Toss them into the mixture...
Mix everything together until the butter is in tiny pieces and the mixture looks moist. I mixed mine for a couple of minutes, increasing the speed a few times.
 
Okay! Now get out your jar of fruit preserves. I got the big jar because some extra peach flavor isn't going to hurt anyone :) In your prepared pan, dump half of the crumb mixture into the bottom and press it with your hands so it's compact. Then spread the entire jar of preserves over that layer.
 
We're lucky that jar isn't a little wider, because I would have most definitely tried to lick the inside :)

 
Spread it into an even layer.

Then dump the other half of the crumb mixture on top of the preserves. Spread it so it's in an even layer and gently press it in with your hands. You shouldn't be able to see the preserves underneath.
Totally covered and ready for the oven!
 
Bake for 30-40 minutes, or until it is golden brown. Let the bars cool completely (this is the hardest part!), then cut them into square bars.
 
 
Then eat as many as you want because they're good for you! They have fruit and oats in them. Just ignore the brown sugar and butter :)
 
 
So crumbly and peachy!

Before I wrap this up, I want to show you some cupcakes! I went to Houston this past weekend to visit my good friend Taylor and we did some damage and some Houston cupcake shops :) Taylor is my friend that I can always talk food and baking with, so she knows how much I love cupcakes! I just had to show you these because they're so pretty!

 
All of our loot!

 Look how cute those pink and green sprinkles are!

 
These mini's are adorable. I love the red velvet with the turquoise frosting and red heart! What a cute color combination!

I hope y'all enjoy! If you make these, let me know what you think :)

Tuesday, March 22, 2011

Grandma's Banana Bars

This is a recipe I grew up eating. I can remember my family having cookouts in my Grandma's backyard in the summers and this would be our dessert. You see, my Grandma's house is a street away from mine, so I was at her house a whole lot. When my house got boring, I went to Grandma's. Problem solved!

She had the coolest front yard and backyard with tons of places to crawl and hide. I was always outside growing up. Kids these days never go outside and just play. They're all about video games and computers. As sad as it is, you can't blame them. That's how the world is now. Technology has taken over!

Grandma also had a pool (with a diving board!) and a huge gazebo that she had built. It was awesome. I felt like I could have my own little adventures there. I loved it.

This recipe is special to me because my Grandma is special to me. Even though her health has declined over the years, I'll always have the memories of watching her in her kitchen. I can see her slicing up fresh fruit for fruit salad, mixing together her potato salad, making these banana bars and making her special chocolate chip cookies that are still my favorite cookies to date.

I know you'll love this recipe! It is beyond delicious. Even though we call them "banana bars" it's really a banana sheet cake with a glaze icing. It's not spicy like banana bread; just pure, moist banana cake. Yum! It screams summer to me because that's when we always had it, and this nice weather we've been having lately is proof that summer is on the way!

 
Ahhh...a glass of cold milk makes everything taste better!

I, of course, had to put my own spin on it. As much as I love the original recipe, I decided to try something a little different this time. Since I'm a sucker for anything with cream cheese and I know my dad is too, I whipped up some cream cheese frosting to use instead of the regular glaze and then I sprinkled some pecans on top. It got a thumbs up in my house!

I'll give you the original and the new version of the icing...you can choose which one you want to use :) You can't go wrong either way!

Grandma's Banana Bars

1 1/2 c. sugar
1/2 c. butter (1 stick)
2 eggs
1 c. sour cream (light is fine- this is what makes the cake so moist!)
3 mashed, ripe bananas
2 tsp. vanilla
1 tsp. baking soda
1 tsp. salt
2 c. flour

Preheat your oven to 375 degrees and grease a large jelly roll pan. Remember how we talked about what a jelly roll pan is last time? Just make sure the sides are at least an inch high!

Place the butter and sugar in your mixer and cream those together.

 
Sorry the lighting is so bad, I made these at nighttime!

Now add both eggs in and mix until everything is combined. It should look creamy and have a consistent texture. Then add the vanilla and sour cream. Mix until it's all combined.

 
Whoops...looks like I added a little extra vanilla. Can't hurt anything, right? :)

Nice and creamy.

Now mash up your bananas. I used bananas I had in the freezer and just let them sit on the counter for 30 minutes or so. They were still a tiny bit frozen, but I went with it and mashed it right up!


Once your bananas are mashed, add them to the batter. Now it's time for the dry ingredients. Add the baking soda, salt and flour. While the mixer was running I added the baking soda and salt, and then while the mixer was still running, I added the flour in small batches. I just used a half cup measure (four times) and slowly added it in.

Y'all know how to measure flour right? You don't pack it in. You get your measuring cup scoop up some flour so it's overflowing.


Then using a knife (or if you're me, your finger!) and scrape the top so it's level.


And there you go! This is important to know when you're baking. Too much or too little flour can totally change the outcome of your recipe!

Okay so all of our ingredients are in the bowl. The batter shouldn't be super thick or super thin. And the bananas don't have to be chunky. The mixer will probably break them up and that's totally fine. Pour the batter into the greased jelly roll pan.

I love how you can see the chunks of bananas!

Bake the cake for 30 minutes, give or take a few minutes. Mine actually took a little less than that. I would keep an eye on it for the last 5-10 minutes and use a toothpick to test it around then. The top will be golden brown and delicious looking!


Unlike the Texas Sheet Cake, you need to let this cake cool completely if you plan on making the cream cheese frosting. If you plan on making the glaze frosting then glaze it while it's still warm.

For the original glaze that my Grandma always uses, it's just a mixture of powdered sugar, milk, and vanilla. That's it! On her handwritten recipe, there's not even measurements, but I've made this glaze before and I think I kind of know the measurements.

1-3 tbsp. milk
1 tsp. vanilla
4-5 c. powdered sugar

I know, they're not exact. But you'll know when it's too thick or too thin. If it's too thick, add more milk a little at a time. If it's too thin, add more powdered sugar. Just play with it until it's the smooth, spreadable consistency you're looking for.

Now! Onto the cream cheese frosting :)


Easy Cream Cheese Frosting

1 (8 oz) package of cream cheese, softened
1/4 c. butter, softened (half of a stick)
1 tsp. vanilla
4-5 c. powdered sugar

Cream together the cream cheese and butter so it's combined. Add the vanilla. Then slowly add the powdered sugar until you get the consistency you want. Mine was a little thick so I thinned it with a little heavy cream.

This frosting is for people who love cream cheese....like me. And my dad. It's super cream cheesy and delicious on all kinds of things. Carrot cake, red velvet cake, brownies....oh yeah. The list goes on and on!

It took a lot of self-control to keep myself from eating this with a spoon. 

Once your cake is completely cooled, spread the frosting all over the cake. Sprinkle with some chopped pecans if you want!

Deeeeeeeeeeeelish!

Really, all you need is a fork and a glass of cold milk. Or just use your hands....wouldn't be the first time someone did that :)


Enjoy y'all!

Thursday, March 17, 2011

Texas Sheet Cake... and why I'm proud to be a Texan.

Is there a better state than Texas? Here's the short answer....no!

Texas is one of a kind.  Did you know Texas is the only state in the United States that is allowed to fly its state flag at the same height as the American flag? That's how great Texas is.

I'm proud to say that I'm a native Texan. I've lived here for over 23 years now (holy cow... that made me feel old) and I love everything about being a Texan. Have you ever seen those bumper stickers that say "I wasn't born in Texas, but I got here as fast as I could?" Everyone wants to be a Texan! 

I love saying I'm from here. I love seeing Texas wildflowers in the spring. I love Texas chili. I love my Texas Rangers. I love Shiner Bock beer. I love Dr Pepper. I love Texas barbeque. I love Texas country music. I love the Texas State Fair. I love how finicky the weather can be. (I've seen days where you'll be bundled up one day and wearing shorts the next.) I even love those hot, Texas summers.

 Beautiful Texas Wildflowers

I have to say though, one of the best things about Texas is the people. Everyone is just so nice here. It's not unusual for a stranger to smile and say "hi" to you as you're walking by and we just take care of each other. I remember when I went to New York for the first time a few years ago to dance in the Macy's Thanksgiving Day Parade. A big group of us were riding the subway and were a little confused about when we should get off. This woman heard us discussing when we should get off, and she yelled at us and told us we were on the wrong train in the rudest way possible and she acted like we were bothering her. New York is just not for me. And when people bump into you up there, don't expect them to stop and say "sorry". In fact, they'll probably tell you the collision was your fault. Now I'm not saying all New Yorkers are like this, but most of the ones I encountered were. I think New York is one of the few other states who are as prideful as us when it comes to their state. There are tons of great things about New York that are worth being proud of, but I think I'll stay down here where I feel at home and everyone is friendly!  

The other day I made Texas Sheet cake because my dad requested it for his Poker Night he was having at our house. It's safe to say that I didn't protest :) I told him I'd make it as long as he saved a piece for the cook! I did some research to find out where the name came from because I was curious and no one seems to know.  

Texas Sheet Cake has become a staple at family gatherings and I'm sure most Texans have had it at one point in their life. There was an article done by Laura H. Ehret at the Dallas Morning News where she researched the origin of the name and she found that Lady Bird Johnson seems to get the credit most of the time. I guess Lady Bird was known for making this cake, however, she called her cake "Mexican Chocolate Cake" because she puts cinnamon in it (I do that, too!) I'm fine with giving Lady Bird the credit for this cake because she was a wonderful Texan. She's also responsible for all the beautiful wildflowers we see every spring!

Another source I found said that she heard this cake got its name because it's big, rich and hot. Apparently, a long time ago it was believed that rich people lived in Texas and we all know that "Everything is bigger in Texas!" And we all know how hot our Texas summers are. So that explanation makes sense too! Either way, this cake is moist, delicious, and it's one that you'll make once and keep making for years to come. 


Texas Sheet Cake 
Recipe adapted from The Pioneer Woman 

2 c. flour
2 c. sugar
1/2 tsp. salt
4 heaping tbsp. cocoa powder
2 sticks of unsalted butter
1 c. boiling water
1/2 c. buttermilk (I'll show you how to make your own!)
2 whole eggs, beaten
1 tsp. baking soda
1 1/2 tsp. cinnamon (Feel free to leave it out if you're not a cinnamon person)
1 tsp. vanilla

Preheat your oven to 350 degrees and lightly grease a sheet pan (a.k.a. jellyroll pan) with some non-stick spray or butter. This is a pan that is rectangular and shallow. I think mine was 15'' x 10" and an 1" deep. You need the sides to be at least an inch high. The reason why it's called a "sheet cake" is because it's thin and wide... Texas sized :)

In a mixing bowl, combine the flour, sugar, cinnamon and salt. Stir together with a fork so everything is evenly incorporated.

 
Before I stirred...obviously :)

In a saucepan, melt the butter over medium heat. Once it's melted, add the cocoa powder and stir together until combined.

 In go the HEAPING tablespoons of cocoa.

 Stir the cocoa into the melted butter. 

 Next add the boiling water. I just turned on the kettle and once it was boiling I measured out a cup and poured it on in. Allow that mixture to boil for 30 seconds (you may have to turn the heat up a little bit), and once it's boiling turn off the heat. Pour this mixture over the flour mixture and stir gently to cool.

 
It'll be pretty thick.
 
Now let's make the wet ingredients. I promised I'd show you how to make your own buttermilk. This trick will save you, guaranteed. There are tons of recipes out there that call for buttermilk and I never, ever have it!
 
Okay, this is easy. Since we need 1/2 cup of buttermilk, get out your liquid measuring cup and pour enough regular milk in to make a scant half cup. That means just below the half cup measure line.
 
 Like this!

Now go to your pantry and get your vinegar. Yes, vinegar! I know it sounds weird, but this really works. I'm pretty sure you could also use lemon juice. You need something really acidic to help curdle the milk a little bit and make it tangy. Pour enough vinegar in so it fills to the half cup measure line.

 Now you have buttermilk! So easy!

Now when you see recipes that call for buttermilk, you can just use this trick. I know, you're welcome :)

Let that sit for a few minutes so the vinegar can do what it's supposed to. In a small bowl, crack your two eggs and beat them a little so they're combined. Stir the "buttermilk" a bit so it's combined. It should look a little thicker on top, almost curdled. Don't worry, it's supposed to look like that! Dump your eggs in and stir. Then add the baking soda and vanilla. Stir again so it's all one big gooey mess.

 I know it doesn't look very appetizing right now. Just you wait!

Pour the wet mixture into the butter/chocolate/flour mixture. Stir gently until everything is combined. This will probably take you a minute because it takes a second for the chocolate and everything to absorb the milk.

 Keep stirring! It'll get there, I promise.

 
Now it's all combined!
 
Pour the batter into your prepared pan. You'll probably see a bunch of bubble floating on the top. What I do (I learned this from my girl, Paula Deen) is just lift the pan a few inches off the counter and drop it. CAUTION: Don't lift it too high off the counter! You'll end up with cake batter everywhere! Just lift it about 3-4 inches. When it lands on the counter the bubbles will pop. Cool trick, huh? I'm just full of them today!
 
 
Bake this gorgeous cake for 20 minutes or until a toothpick inserted into the center comes out clean. The top of the cake will look baked, as well.

While the cake is in the oven, we need to make the frosting. The best part about this icing is that you pour it over warm cake. Normally you have to wait impatiently patiently for the cake to be cooled and then you can ice it. Not this one!

Chocolate Pecan Icing (the best part!)
 
1 c. finely chopped pecans
1 3/4 sticks butter
4 heaping tbsp. cocoa powder
6 tbsp. milk
1 tsp. vanilla
3/4 tsp. cinnamon, or to your taste
1 lb. powdered sugar (3 1/2 cups)

Melt the butter in a saucepan. I just washed out the one I used before and used it again. Make sure you use 1 3/4 sticks and not 1 3/4 cups of butter. Use a stick plus 6 tbsp.
 I ran out of butter and had to use margarine for the 6 tbsp. Whoops! Oh well, it's practically the same thing.
 
Chop up the pecans finely. They don't have to be teeny tiny pieces.

 
The left side is chopped and the right side isn't! Does that help?

Add the cocoa powder to the melted butter and stir to combine. Then turn off the heat. Add the milk, vanilla, cinnamon and powdered sugar. Stir all that together.

I had a helper! This is Cody, we've known each other since kindergarten. Can you believe I've put up with him for that long?! Just kidding :)

 Stir, stir, stir!

Now stir in your chopped pecans and your icing is done! Just let it sit until the cake is out of the oven. Once it's out, I let it cool for about 10 minutes just so it's not piping hot. Then pour the icing over the cake and spread it so it covers it all.

 Yum! I think I could eat the icing all on its own.

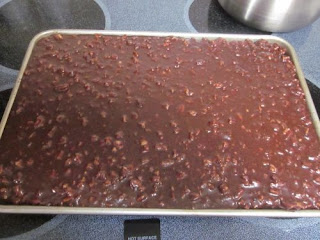
 The finished product! You will fall in love when you try it, and so will everyone else! 

Let the cake sit out at room temperature for a little while so the icing can set and thicken up a bit. This cake will seriously rock your world!

I hope y'all enjoy. If you make this, please let me know what you think! And feel free to share what you love about Texas with me!

Sunday, March 6, 2011

Cajun Pan-Fried Tilapia... and my love for Southern Living.

I love Southern Living (I'm talking about the magazine, folks). Seriously. I devour each issue and I always look forward to getting it in the mail each month and looking at all those gorgeous pictures of the South. I love reading about cool things happening in the South, true Southerners, decorating tips and, of course, the RECIPES! I feel like I've grown up with Southern Living. I could always find the latest issue on my Grandma's coffee table because she's been a subscriber for years and years. Her and my mom both have a bunch of the "Annual Recipes" cookbooks from several years and I know I've used these as a reference several times, especially that big brown one on the right (Sorry you can't see it very well!)

Mom's Southern Living cookbooks... Grandma has even more!

Since I'm such a good shopper (Mom taught me well...) I found this little gem at Marshall's for $10. Yup, you read that right. Ten. Dollars. I am obsessed with it. It even comes with a DVD with how-to videos, menu plans and shopping lists. Genius! To be honest, I haven't used it yet. I've been too busy obsessing over the recipes. 

 
My pride and joy! Don't the pictures on the cover make you want to dive into it head first?

It's organized perfectly; everything is so easy to find and all of the recipes look incredible. This is like the Southern Cook's bible. There are recipes for all the classic southern meals, sides, desserts, drinks....everything! I think it is the updated version of the big brown one my mom uses. I know this is a cookbook I'll use for years and years until the pages are all stuck together because I got food on them while cooking. Oh well, that's how you know a recipe is good. Remember how beat up my Banana Nut Bread recipe was?!

Anyways, Southern Living has become my go-to when it comes to finding good recipes. To me, they're a source I can trust. I know that the recipes are tried and tested because Southern Living wouldn't tag their name on to just any recipe. 

I've gotten really sick of chicken lately, so I went to the store and got some tilapia without a recipe in mind. I just needed something different! I'm not one of those people who can eat the same thing over and over again. I don't even order the same thing at Starbucks everytime I go. I need some variety!

So when I got home the first place I looked for a recipe was Southern Living, of course. This recipe popped up first when I searched "tilapia" and it was highly rated. Plus, I had all the ingredients I needed so it was a no-brainer, but y'all know me... I had to change it a little bit :) The original uses cornmeal to coat it, but I love the texture of panko so I decided to use that instead, but use what you like! You could use regular breadcrumbs too, I'm sure.

Cajun Pan-Fried Tilapia (My Version)

3 tilapia fillets
3/4 c. panko bread crumbs
3 tbsp. flour
1 1/2 tsp. creole seasoning (creole, cajun...whatever)
1/2 tsp. garlic powder 
1 egg
1 tbsp. milk
1 tbsp. butter
2 tbsp. olive oil

Sprinkle each tilapia fillet with a little creole seasoning on both sides. Do this lightly because there's definitely some heat in that seasoning and you'll be putting creole seasoning in the breadcrumbs too. If you don't have creole seasoning I'm sure you could make your own version. I would add some paprika, cayenne, salt and pepper, of course, garlic powder, onion powder. Whatever you want! Just season it however.


Next beat your egg in a shallow dish until the yolk is broken up and the whole mixture is the same color. Add 1 tbsp. of milk and stir that to combine.

Now it's time to mix your dry mixture. Dump the panko bread crumbs onto a plate or shallow dish. Add in 1 tsp. of creole seasoning and the garlic powder. Mix that with your fingers so it's all evenly distributed. Have y'all tried panko breadcrumbs before? Oh man, they're good. They're so crunchy and the best part is they stay crunchy. That's my biggest complaint about regular breadcrumbs is that they get so soggy sometimes. Give panko a try!

 
See those little specks of flavor? :)

Get out a large skillet and set it over medium heat. Add 1 tbsp. of butter and 2 tbsp. of olive oil.

 I don't know how my oil poured out in that shape... It looks like a sideways tooth!

While that's heating, let's coat the fish. Place one fillet in the egg mixture and flip it over so both sides are coated in it. Then set it in the panko and coat both sides. You may have to press the breadcrumbs onto the fish. Mine didn't stick super well the first time, which is why I made up the egg mixture in the first place, but it doesn't have to be 100% coated. You just want it mostly covered so you get the crunch!

Here's my little assembly line.

 
See? It's not all covered, but that's okay.
 
Your oil should be ready now. Swirl it all around so it covers the bottom of the pan.
 
 Like this!

Set two of the fillets in the pan and you should hear the oil start to crackle! You want that sizzle sound because that means it's cookin' away! I did two fillets and then waited to do the third one because I didn't want to crowd the pan. 


Look at them cookin' away!

Let them cook for about 3-4 minutes, then give'em a flip. If they break, don't sweat it! It's just food, y'all. It's meant to be messy. You want them to be pretty golden and crispy when you flip them.

 
Golden brown...
 
Let them cook another 3-4 minutes. You want the fish to look white on the inside, not raw at all (obviously). Once they're fully cooked take them out of the pan and cook the remaining fillet the same way. I had to add a little more oil and butter because my first fillets soaked it all up! 
 
I served the fish with some brown rice (it's a little healthier than white....and yes I see the irony since I served fried fish. It happens, okay?) and some corn. For the brown rice, I made it according to the package and added some butter and garlic salt until it tasted right. I thought it was pretty good!
 

I hope y'all try this recipe. It's seriously good and pretty easy. Let me know what you think if you try it :)